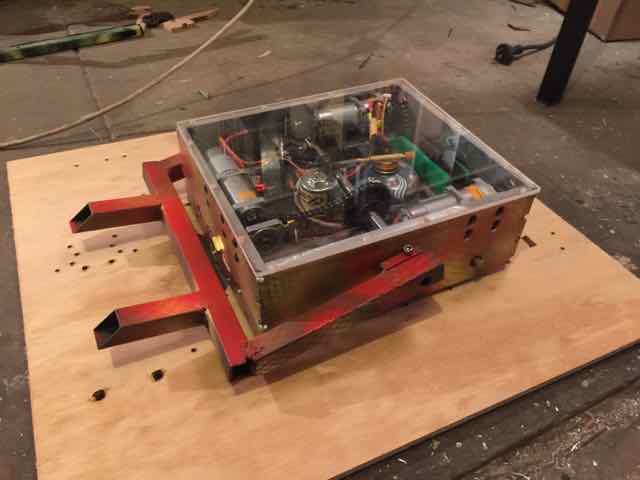
Those of you who came to the event in Gladstone in December will remember my second robot Flamin Heck. It's built from 10mm 6061 aluminium, has six wheel drive and is armed with a lifter and blowtorch. It looks like this:
Boxy huh? Actually, since this photo was taken I made a 10mm aluminium lid for it with a big polycarbonate window in there. I didn't trust that polycarb lid to protect the LiPo or gas canister from Miles and Jules' Pickasso. Anyway, I got the blowtorch working well ahead of Gladstone but didn't leave myself anywhere near enough time to get the ambitious drive system working properly. I've been tinkering away on it over the last couple of weekends and things are starting to get better.
Last edited by chunkulator on Sun Jan 22, 2017 9:44 pm; edited 1 time in total
Sun Jan 22, 2017 8:43 pm
chunkulator
Joined: 27 Jul 2016
Posts: 219
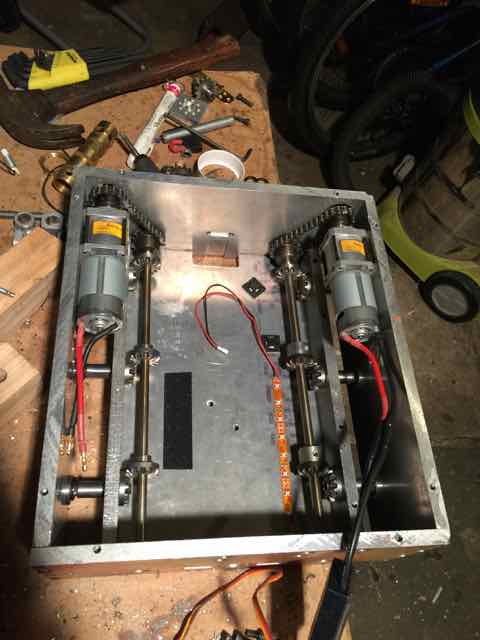
Here's the guts of the drive system with most of the other stuff removed:
It's driven by two BaneBots P60 gearboxes via chains to the two 8mm driveshafts. The main driveshafts drive BaneBots T81 wheels through three sets of bevel gears on each side.
In this photo the brass venturi blowtorch tube is still in place.
Sun Jan 22, 2017 8:50 pm
chunkulator
Joined: 27 Jul 2016
Posts: 219
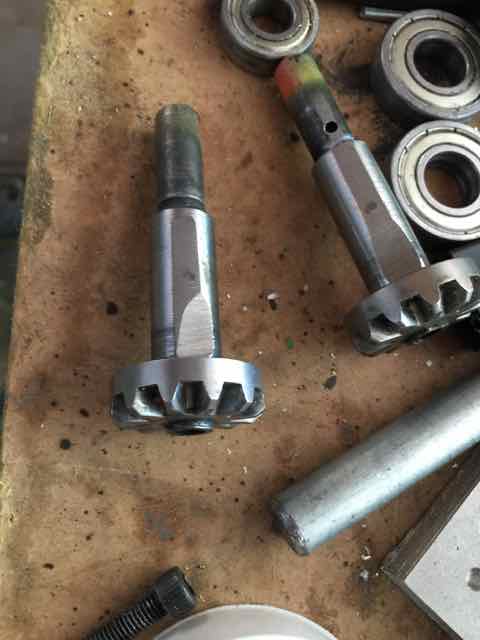
The bevel gears come from cheap right angle drill adapters. Bunnings were blowing these out at $10 so I bought 6 of them. When I pulled them apart I found that the input shaft (that you put into your drill chuck) is 1/2" internally and then 3/8" on the outside and it's long enough to be an axle for a BaneBots T81 wheel. You can put an R8 bearing on one side of the wheel and an R6 bearing on the other. Here's what the output shaft looks like (I hurriedly ground a flat on it and you can see some overspray from the paint job).
The other shaft on the right angle adapter (the one that has the output chuck on it) is riveted through its bevel gear in the same way is the input shaft is. If you grind off the end of the rivet, the gear comes off the shaft easily. It has a D-shaped 8mm ID, designed to go on a shaft with a flat.
Sun Jan 22, 2017 9:01 pm
chunkulator
Joined: 27 Jul 2016
Posts: 219
In order to mount the bevel gears, I originally cut two lengths of 8mm mild steel rod and ground a flat all the way down one side of each. This takes a lot of grinding and makes the rod extremely hot (more on this later). To hold them in place I originally drilled holes through the shaft and put pins through (some of them were cotter pins and some of them R pins).
This arrangement looks promising, but I couldn't get it to run smoothly enough to fight at the event. It kept binding with no obvious easy fix.
Once I had a good look at it last weekend I discovered two key problems:
1) The bevel gears weren't well enough aligned.
2) The driveshafts were no longer straight.
The first problem arose because I didn't have time to CNC cut all the panels in the first place. I cut the outside edge of the panels out with a circular saw (not even a table saw or anything because I completely ran out of time).
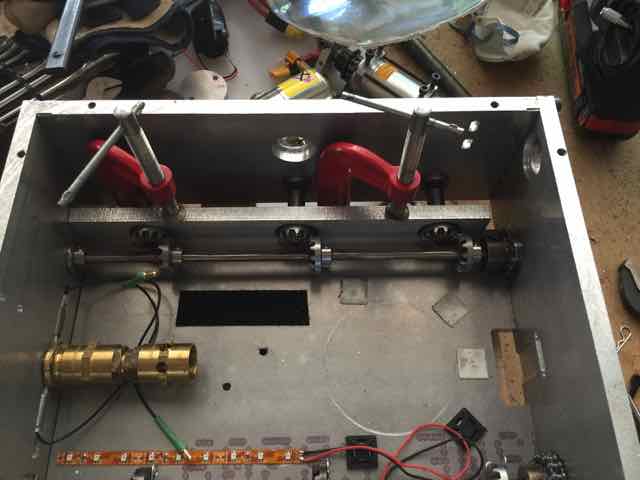
To fix the first problem, I CNC cut new bearing-mounting bulkheads this weekend and clamped them in a position where the drive ran true while drilling mounting holes for them:
Last edited by chunkulator on Sun Jan 22, 2017 10:17 pm; edited 4 times in total
Sun Jan 22, 2017 9:16 pm
chunkulator
Joined: 27 Jul 2016
Posts: 219
I also ground new driveshafts from two lengths of ground 8mm 4140 rod I had on hand and used shaft collars instead of pins for locating the bevel gears. This allowed much more accurate control on how the gears meshed.
However, I noticed that after grinding the flats on the shafts they were no longer straight. They get super hot if you do this much grinding with an angle grinder and when they cool they're slightly bent. I managed to straighten them out a bit by hand and got the system to run smoothly enough that it's reliable and doesn't bind (yay!), but I think fundamentally I need to get rid of the flats on the shafts or cut them a different way.
I have a CNC router table which is pretty sturdy and can cut aluminium (slowly!) ok, but it has no chance at this job. I may be able to get someone with a proper milling machine to machine them down. That's one solution. Another solution may be to cool them with water or cutting fluid while grinding to avoid heating them up so much.
The other solution I can think of is to put the outer edge of the bevel gears in a 3 jaw lathe chuck (I don't have one of those either - yet) and make the internal hole circular instead of D-shaped. Then I can weld them to a normal piece of 8mm rod.
Anyway, they now run well enough that I will reassemble the robot and take it for a test drive in the coming weeks. I'll worry about perfecting it later.
Sun Jan 22, 2017 9:30 pm
chunkulator
Joined: 27 Jul 2016
Posts: 219
Here's where I got to at the end of the weekend. Both sides of the drive run pretty smoothly, but you can see and hear that the driveshafts aren't perfectly straight. If I was going to try this drive design again, I'd try to support the shaft at a couple of points along its length. Basically a couple of 608 skate bearings in aluminium bulkheads. I considered doing this at design time but decided to start simple and hope it would be ok. Possibly I could even retrofit bearing blocks. I'll think about that.
Due to an AliExpress SNAFU I'm still waiting for the rest of my small 8mm shaft collars but when the rest show up I'll swap out the two giant ones you can see I had lying around.
Sun Jan 22, 2017 9:37 pm
chunkulator
Joined: 27 Jul 2016
Posts: 219
For interest's sake here's a shot of what it looked like with everything packed in shortly before Gladstone. The lifter is driven from a 256:1 BaneBots P60 gearbox through a 30:14 #25 chain drive, giving around 500:1 gearing.
The gas canister is a 100g Jetboil propane/butane camping stove canister. I bought a $12 replacement camping stove hose, cut the end off and plumbed it into a nitrous oxide solenoid valve that I bought from a revhead Ebay store in the US. The outlet of the solenoid valve has a brass stopper screwed into it, through the middle of which I drilled a 0.6 mm hole to act as a nozzle. This shoots down the venturi tube made of brass doo-dads from the Bunnings plumbing aisle. At the outlet there is a pair of BBQ igniter electrodes with a spark between them generated by one of these:
It's hard to see in this photo, but there's a 6mm polycarbonate plate that screws down on top of the drive system. It holds the ESCs in place (not mounted in this photo) and locates the gas canister.
Sun Jan 22, 2017 10:05 pm
Cpnwolfe
Joined: 29 May 2012
Posts: 454
Location: Rockhampton/qld
the photos really do not do it justice this thing looked smexay as hell! _________________ Creative Instigation - Build Something Awesome!
That's very kind of you Harley. I guess I'll post a glamour shot once I get it all back together.
Mon Jan 23, 2017 9:38 am
Nick Experienced Roboteer
Joined: 16 Jun 2004
Posts: 11802
Location: Sydney, NSW
That drive system is interesting and probably unique in combat bots - a real space saver with the motors positioned over the wheels . _________________ Australian 2015 Featherweight champion
UK 2016 Gladiator champion
Mon Jan 23, 2017 3:25 pm
chunkulator
Joined: 27 Jul 2016
Posts: 219
Indeed. Space saving was the main driver. it was tricky fitting in that big round gas canister any other way without sacrificing multi-wheel drive or making the robot huge.
Mon Jan 23, 2017 3:34 pm
Nick Experienced Roboteer
Joined: 16 Jun 2004
Posts: 11802
Location: Sydney, NSW
The gas can is a really good find; it looks like part of a light weight camping stove - correct? The smaller gas refill cylinders are just about useless and your set-up is a great alternative to the larger tanks that are not allowed in the rules. _________________ Australian 2015 Featherweight champion
UK 2016 Gladiator champion
Mon Jan 23, 2017 3:40 pm
chunkulator
Joined: 27 Jul 2016
Posts: 219
That's right. It's a 100g lightweight canister and you can get them at many camping shops. Anaconda carry them. BCF don't, but I was able to get them at Gladstone Camping Centre. Availability was a key concern since I knew I was going to be travelling interstate with this robot and you can't fly with gas canisters.
Someone mentioned it on the forum in the lead-up to the Gladstone event. I spent ages looking but couldn't find anything in a nicer shape that fit under the 4 fl.oz. limit.
Mon Jan 23, 2017 4:11 pm
Nick Experienced Roboteer
Joined: 16 Jun 2004
Posts: 11802
Location: Sydney, NSW
Yeah, you nailed the gas cylinder problem - can't believe I didn't think of it. Maybe it because my camp stove uses kerosene . _________________ Australian 2015 Featherweight champion
UK 2016 Gladiator champion
You cannot post new topics in this forum You cannot reply to topics in this forum You cannot edit your posts in this forum You cannot delete your posts in this forum You cannot vote in polls in this forum

 RoboWars Australia Forum Index
-> Builders Reports
RoboWars Australia Forum Index
-> Builders Reports