|
|
|
|
|
|
|
|
|
|
|
|
|
|
|
|
DumHed
Experienced Roboteer

Joined: 29 Jun 2004
Posts: 1219
Location: Sydney


|
I still need to take photos of all the bits, but here are some basic specs:
Frame:
square steel tubing (dexion speed frame from junked workbenches)
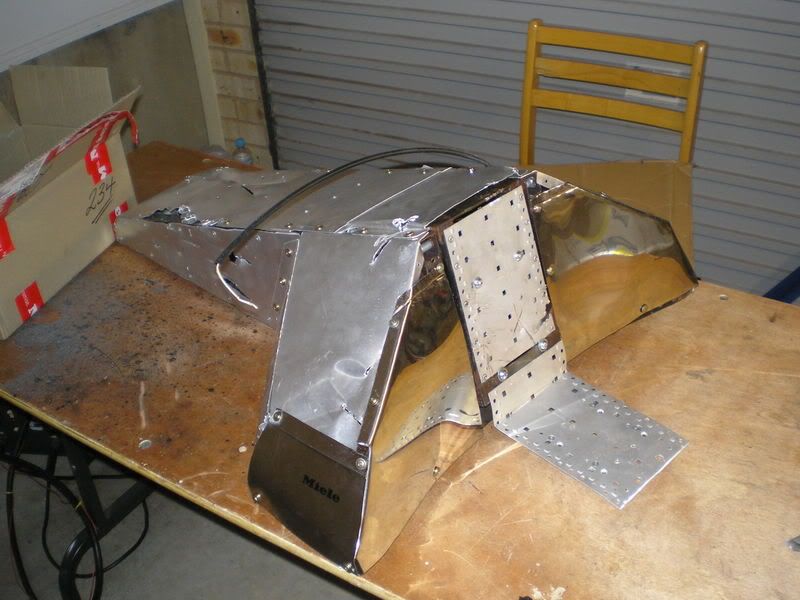
Armour:
1mm aluminium sheet, riveted on in permanent areas and screwed on in areas that could need removal.
The ends of the wheel pods have 3mm armour and the flipping arm has 3mm plating made from leftover rack case side panels (pre drilled mounting holes!)
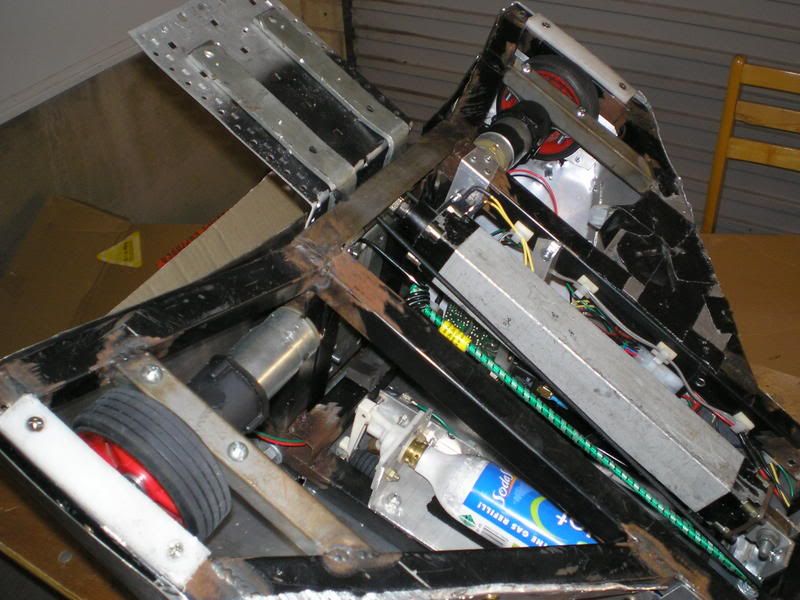
Drive:
XU-1 12v drills running at 12v with skinny white 105mm bunnings wheels ($3.50 each) and hubs made from 10mm high tensile nuts with a plate welded on which screws into the wheels.
Conduit brackets hold the motors onto the frame rails.
There are two castors in the tail, mounted in fairly far to protect them from undercutting.
Power:
A small (700mAh) 12v NiMh pack (made from 7.2v packs removed from old equipment) powers the control system, and a 12v 4.5Ah NiMh powers the motors and solenoid / actuator. That pack was a sample used for battery powered stuff we were developing at work.
Weapon:
CO2 powered flipper with semi automatic control.
The ram ($15 junk shop special) is mounted along the bottom of the robot, operating the flipping arm as an accelerating linkage for good "throwability".
The CO2 is supplied from a SodaStream gas tank ($10 for the whole SodaStream machine from St Vinnies, with a full tank), using the SodaStream valve setup operated by a central locking actuator I had lying around.
When the flipper fires the gas valve is turned off by a microswitch at about 75% of its throw. As soon as the flip button is released the vent solenoid (an old boost control solenoid) opens and the ram is returned by two elastic cords.
When the flipper arm returns the vent solenoid is turned off by another microswitch to save power.
I drilled some exhaust ports into the ram at about the 90% extended position to make sure it vents excess pressure when it's open - partly to prevent damage and partly to make sure the vent solenoid will open. In testing with an air compressor it didn't like to open with more than about 40psi behind it.
There are skid pads (chopping board scraps) beside the wheels for undercutter protection, and also to provide something solid for the flipper to push against.
There is some flex in the wheels and motor mounts to allow the skid pads to bottom out without damaging the drive system.
The front of the frame extends beyond the pivot point of the flipper, to keep the center of gravity as far back as possible to prevent self flipping.
The gas bottle is removable from under the robot after removing one bolt to loosen the clamp, allowing it to unscrew from the valve assembly.
Control:
The control system was lifted from a "Kool Kidz Racing" radio control F1 car I bought at Coles a while back for $50, intending on using it with a better control system for racing fun.
It's a super basic 27MHz non proportional system with a wheel style transmitter. It has Fwd/Rev/Turbo on the trigger and left/right on the wheel.
I modified the transmitter to add a separate button on the turbo speed mode to use as my weapon channel.
The receiver board used relays to drive the original motor (550 like a drill) and has a small H bridge driver for the steering motor (like a servo but with no feedback).
I upgraded the relays to 30A horn relays, using the turbo speed relay to drive the weapon (NO to gas valve and NC to vent solenoid) and the others for Fwd/Rev.
I also added another pair of relays via diodes to the steering output which are used to kill power to the inside motor for steering (yep, no spin on the spot mode!)
The turbo speed function can't be used while using the low speed mode, so I can only fire the weapon if I'm not driving forward, which works well for reducing load on the motors and gearboxes while flipping.
_________________
The Engine Whisperer
- fixer of things
|
 Tue Jan 17, 2006 1:42 pm
 |
|
|
|
|
|
|
|
|
|
|
|
|
|
|
|
|

 RoboWars Australia Forum Index
-> Builders Reports
RoboWars Australia Forum Index
-> Builders Reports


 [/img]
