Joined: 16 Jun 2004
Posts: 486
Location: Melbourne
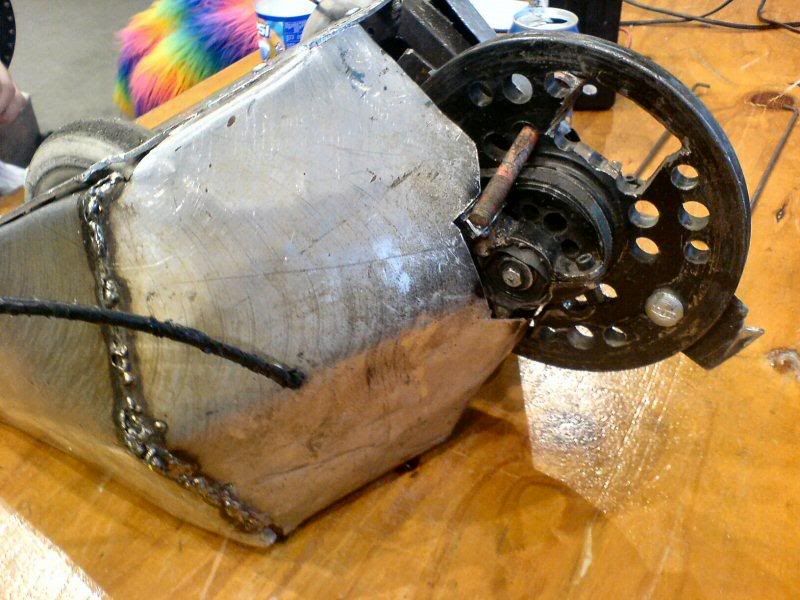
An interesting couple of days robot building. I've welded in the 19mm shaft for the weapon, found a brass tube that will fit over the top of it and work as a bushing. And I welded some more steel onto the frame to support the armour. Overall the bot is comming togeather well with only a few minor problems, weight as always, I've had to make minor changes to the armour design or it was going to be overweight.
Thu Jun 15, 2006 6:43 pm
NMO Experienced Roboteer
Joined: 16 Jun 2004
Posts: 486
Location: Melbourne
The robot is now sitting at 11.6kg's with and is almost complete, It just needs the top and back armour fitted and I need to get a new pulley for the disk of a larger diameter, Does anyone know what the standard sizes are for the holes in pulleys (shaft size)??? I need one that's around 27mm.
Sat Jun 17, 2006 2:28 pm
NMO Experienced Roboteer
Joined: 16 Jun 2004
Posts: 486
Location: Melbourne
Joined: 19 Jun 2004
Posts: 338
Location: Roleystone WA
That looks pretty nice!
Sat Jun 17, 2006 3:29 pm
NMO Experienced Roboteer
Joined: 16 Jun 2004
Posts: 486
Location: Melbourne
Well I mounted the disc and cooling fans today, I purchased a bushing so it's running really smooth. The ratio on the disc is now around 1:1 so it's a lot faster starting up. At this stage 6x7 should be ready for the 9th of July!!! There are only a few minor things left to do.
Sat Jun 24, 2006 5:43 pm
NMO Experienced Roboteer
Joined: 16 Jun 2004
Posts: 486
Location: Melbourne
So, IU'm calling the robot about ready for Grantville, only thing left to do is a power light, and screw on rear armour, this will be it's first real test so I'm expecting a couple of minor problems as always
Joined: 19 Jun 2004
Posts: 338
Location: Roleystone WA
Hey, looking pretty nice there, well done.
Sun Jul 02, 2006 6:51 pm
NMO Experienced Roboteer
Joined: 16 Jun 2004
Posts: 486
Location: Melbourne
So 6x7 drove well on the weekend except for 2 minor problem, well lets be honest, majior problems.
-1- The weapon motor, a flat magna motor, blew up within 2 seconds of getting there,
-2- RADIO ISSUES
I plan on getting a new weapon motor this weekend, and Mat and I have ordered a spektrum dx6 each.
The 18volt motors seamed to hold up to 24 volts really well so Im wrapped with them!!! ANDREW MODS RULE.
Tue Jul 18, 2006 7:52 pm
Rotwang Experienced Roboteer
Joined: 15 Jun 2004
Posts: 1589
Location: Vic
So you are sold on the spektrum dx6 Very happy with ours, just wish we had a couple more.
We have had zero motor failures with any of our 18volt drills on 24 either, good combination and it does weigh in a lot lighter than the scooter combo.
Wed Jul 19, 2006 12:53 pm
NMO Experienced Roboteer
Joined: 16 Jun 2004
Posts: 486
Location: Melbourne
Ok so robot report from Grantville.
Lessons' learnt!!!
18volt drill motors don't like 24 volts.
I fried one motor and the gearbox slid out of the fibreglass section of the andrew mod, easy fixed.
The bot also threw the belt on the disk and bent one of the teeth on the disk.
ACTION ITEMS
-Change robot to 18volts (15 cells)
-glue gearbox back into fibreglass and place large washer at shaft end to stop it sliding out (washer from front of origional drill that holds clutch ring in place)
-replace burnt out motor
-redo mount for weapon disc. (go for a little drive to Geelong)
-I aquired some conveyor belt from Danny, so use this as armour
POSSIBLE ACTION ITEMS
-Shorten main frame of robot to reduce weight. (There is plenty of empty space inside the bot.)
GOOD stuff
Spektrum radio's are ausome!!!!! we didn't have one radio glitch all day!
Tue Aug 29, 2006 9:09 am
Totaly_Recycled Experienced Roboteer
Joined: 15 Jun 2004
Posts: 1346
Newen
A tip when instaling the new motor on the moded gear boxes if you use the motor with the new end cap put a small blob of silastic in the two spare mounting holes just enough to seal the hole put be carefull not to push too much through the holes as it will obstruct the cooling air vents and also put a small bit over the screws then just a smear around edges of the new end cap this is to stop the oil leaking into the motor and out of the gear case ..
Cheers Andrew
Tue Aug 29, 2006 9:36 am
NMO Experienced Roboteer
Joined: 16 Jun 2004
Posts: 486
Location: Melbourne
Ok a few things to report
-1- We've been working on a bearing mount and might have finally come up with a solution. We tried to buy a peice of steel tube with an ID the same as a 1/2 pully O/D but of course nothing is that easy.
We tried using larger ID tube and packing it out, but of course Nothing is that easy and while it worked in theory the disc wobbled heaps.
This is the best solution so far and has very little wobble. I would have taked a photo of it while building but had built it before thinking about camera.
-2- Battery packs have been redone to make then stronger to shocks and also rewired for 18Volts not 24.
-3- External armour has changed to conveyor belt thank's to Danny's donation.
-4- Work is slowly progressing on the Telemetry for this robot.
Wed Oct 18, 2006 5:24 pm
Knightrous Site Admin
Joined: 15 Jun 2004
Posts: 8511
Location: NSW
Neweyn, have a look at VL
Andrew used a bit of slightly oversized tubing, cut a slot in it about 5mm thick, welded some tabs on the and and put a bolt through the tabs. Tightening the bolt tightings the tubing and clamps onto the bearing. Andrew put a bit of rubber between the tubing and the bearing and then tightens it up as to add a bit of shock protection and to prevent crushing the bearing. I'll see if I can find a better photo for you _________________ https://www.halfdonethings.com/
You cannot post new topics in this forum You cannot reply to topics in this forum You cannot edit your posts in this forum You cannot delete your posts in this forum You cannot vote in polls in this forum

 RoboWars Australia Forum Index
-> Builders Reports
RoboWars Australia Forum Index
-> Builders Reports